
Hello all,
In this blog post, I am going demonstrate a few of the features of Covenant C2 framework.Please follow the instructions to install Covenant C2 from official Github repository
https://github.com/cobbr/Covenant/wiki/Installation-And-Startup
Listener: -

In my case, I configured Covenant like this and name of the lintener is http:

Grunt: -


Upload this binary to target machine and execute it.

First of all, create an HTTP launcher which will be used by Covenant agent to communicate to Covenant framework.
Once Grunt payload will be executed on the target, session will be created which can be accessed just by clicking it:

Grunt's info tab shows the basic info regarding the Grunt agent and the target machine:

To execute commands on target machine, either use Interact tab (CLI interface) or go for Task tab.
Interact Tab: -
This is the CLI interface of covenant which will used by Covenant to show commands executed by user and their output.

Task Tab: -
Task tab is actually GUI to select a task which will be executed by the Covenant and this interface allows a user to specify the parameters to the selected task:

OS command execution:
Let's go for 'Task' tab because it is self-explainatory and begineer-friendly.
For OS command execution, use shell or shellcmd task module:

After clicking Task button, We will be dropped to the Interact tab automatically where output of the task will be displayed:

We can execute other OS commands using this task module.
AD environment related attacks:
Let's go for the AD environment based attacks such as,
1. Kerberoasting
2. Impersonating logged-in user
3. Dumping NTLM/Plaintext password of logged-in/local user account
1. Kerberoasting
It can be performed using in-built Task or we can go for PowerShell based scripts. Covenant has 2 in-built Task which are Kerberoast and Rubeus.
Rubeus is my first choice because of the fact that in Kerberoast Task, we need to specify the name of the SPN for which we want to perform Kerberoasting whereas in case of Rubeus, we need not to do so.
So let's start with Rubeus. Just select Rubeus and make sure kerberoast is mentioned in the command input field:

Click Task button and wait for the output:
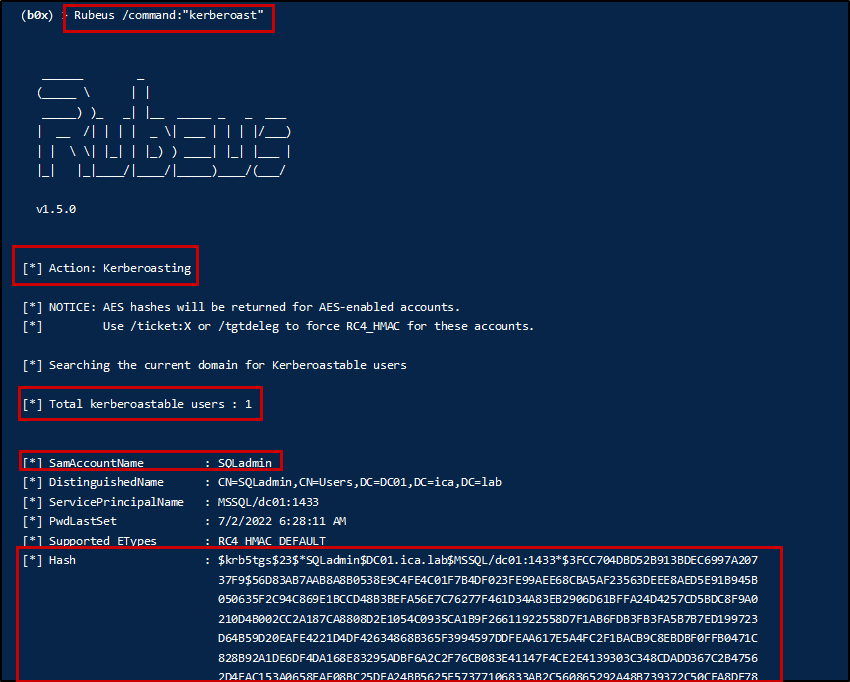
There we go!!!!
Let's try with PowerShell script.
I personally like to go for PowerShell script based kerberoasting. We have very awesome script in PowerShell Empire framework which is developed by Harmjoy bhai ji
Link:
Download the script, and in Task tab, select Task type PowerShellImport and browse the kerberoasting PowerShell script. By clicking Task button, script will be imported to the Covenant and we can use it using PowerShell 'Task':

Now, in Interact tab, execute below mentioned command to perform kerberoasting against every SPN registered in the domain:

After successful attempt, we will get the output something like this:

Now, try to crack it using hashcat or any other tool of your choice.
2. Impersonating logged-in user
This technique is all about impersonating a Domain user which is logged-in to the machine in which we have local admin privilege. We can impersonate any user logged-in to the machine.
To make most of an impersonated user session, it is always recommanded to launch a new Grunt once user account has been impersonated.
To impersonate a user session, first of all we need to find the list of logged-in user whch can be done using Task GetNetLoggedOnUser. Specify the hostname of the machine for which we have Grunt session:

We have a Domain user with name 'Administrator' which is logged-in to the current machine:

To impersonate this user, use below mentioned command:
which will be like this in my case
By executing the WhoAmI command, we can see that we have impersonated user Administrator successfully:

Now, to get a Grunt session as Administrator user, execute below mentioned command using impersonated user session:

And we will have a new session with the privilege of impersonated user:

Using newly created session, we can execute command to move laterally (if this user has access to other machine).
For example, this user has local admin privilege on another machine, command execution is possible. To list the user account on remote machine, executing "net user" command using PowerShellRemotingCommand Task:
in my case it was:

Or using WMICommand Task

3. Dumping NTLM/Plaintext password of logged-in/local user account
This is simple one, we just need to use Mimikatz Task:

And there we go ......

Thanks for reading.
Special thanks to: - Burcu YARAR, Sean Metcalf, OJ, hacker fantastic, A K Reddy,Vincent Yiu, Andrew Robbins, will,
Benjamin Delpy, Marcello, Andrew van der Stock, g0tmi1k, Alvaro Muñoz, b33f, pancake, m3g9tr0n, Anurag Srivastava, vivek chauhan, Manoj and Karan
--==[[ Greetz To ]]==--#############################################################################################zero cool, code breaker ica, root_devil, google_warrior, INX_r0ot, Darkwolf indishell, Baba, Silent poison India, Magnum sniper, #ethicalnoob Indishell, Reborn India, L0rd Crus4d3r, cool toad#Hackuin,Alicks,mike waals, Dinelson Amine, cyber gladiator, Cyber Ace, #Golden boy INDIA, Ketan Singh, AR AR, saad abbasi, Minhal Mehdi, Raj bhai ji,Hacking queen, lovetherisk, Bikash Dash, D3############################################################################################# --==[[Love to]]==--#
My Father ,my Ex Teacher, cold fire hacker, Mannu, ViKi,Ashu bhai
ji, Soldier Of God, Bhuppi, Anurag, Cyber Warrior, Vivek Sir#Mohit, Ffe, Ashish, Shardhanand, Budhaoo,Incredible, Hacker fantastic, Jennifer Arcuri and Don(Deepika kaushik)


0 comments